KindEditor的简单了解
简单使用:


更多参数了解:
KindEditor的图片上传(临时目录):
uploadJson: '/uploadfile.html', //文件上传路径 extraFileUploadParams: { //文件上传的额外参数 'csrfmiddlewaretoken': '{ { csrf_token }}' //令牌使用,在POST数据上传时需要的 }, //filePostName:'img', 修改上传的文件名字 这3个和图片上传有关(了解)
后台处理:
settings配置:
MEDIA_URL = '/static/uploads/'MEDIA_ROOT=os.path.join(BASE_DIR, 'static/uploads') #注意使用路径连接时后面的必须是相对路径IMAGE_FIELDS = ( 'jpeg', 'png', 'gif', 'jpg', 'bmp',)


>>> os.path.join("c:/mypy/","/da/dwa") 'c:/da/dwa'>>> os.path.join("c:/mypy/","da/dwa")'c:/mypy/da/dwa'注意后面不能写成绝对路径,不然路径连接时会出错(可以想下linux等系统,不分盘符,'/'就是根路径),所以我们注意这里 url设置:
url(r'^uploadfile.html$',home.uploadFile,{ "document_root": settings.MEDIA_ROOT,'web_root':settings.MEDIA_URL,'image_list':settings.IMAGE_FIELDS}), 文件上传处理业务:
def handle_uploaded_file(fp,filePath,webPath,filename): //fp文件指针,filepath是我们存放文件的基础目录, webpath是我们网站访问该图片的目录,filename是文件名 if not os.path.exists(filePath): os.makedirs(filePath) with open(filePath+filename,'wb+') as destination: for chunk in fp.chunks(): destination.write(chunk) //写入文件 return webPath+filename //返回web访问的文件路径def uploadFile(req,*args,**kwargs): if req.method != "POST": return redirect('/') status = { 'error': 0, 'url': '', 'message': '' } if req.FILES['imgFile']: file_name = str(req.FILES.get("imgFile")) from blog import settings if file_name.split('.')[-1] in kwargs['image_list']: #先上传到临时文件夹中,然后在与用户提交的评论进行正则匹配,若是匹配到的数据,则移动到正常文件夹中,剩余的图片(用户在编辑时自己删除了的)我们清空该文件夹,并替换用户的图片路径即可 #static_path = "comment/"+str(datetime.date.today())+'/' static_path = "temp/"+str(req.session['user_info']['id'])+'/' #以用户id为文件名的临时文件夹 web_path = kwargs['web_root'] + static_path file_path = kwargs['document_root']+'/'+ static_path ret = handle_uploaded_file(req.FILES['imgFile'],file_path,web_path,file_name) status['url'] = ret else: status['error']=1 status['message']="文件格式不正确" else: status['error'] = 2 status['message'] = "文件上传失败" return HttpResponse(json.dumps(status)) KindEditor的图片处理思路:
为用户先创立一个临时文件夹,在用户上传评论时,与img标签进行正则匹配,若是匹配到的数据,我们则移入到正确的路径,然后将临时文件夹删除即可。
其他思路可以参考:
基本上2种解决方案:1. 先把图片提交到临时目录,提交到服务器后,用正则提取图片路径,和上传过的图片比较,如果用到就把图片移动到实际目录。2. 采用图片空间管理,让用户自己删除多余的图片,一个用户的总容量限制就可以了,现在很多大网站都是这个做法。
或者:前端使用ajax进行删除,但是如果用户可以进行撤销操作,那么原来的图片使用ajax似乎不太正确:
大概思路:

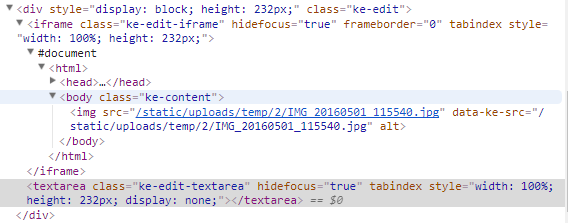
可以知道数据是使用iframe进行传输的:iframe无刷新上传文件:(了解)
我们可以操作该对象,对img点击事件进行监听
$(".ke-edit-iframe") //获取iframe对象obj = $(".ke-edit-iframe") .contents() //获取iframe中的document对象$(obj).find("img") //获取img元素对象,使用click等就可以进行监听,使用户点击使进行删除选项,同意则使用ajax进行删除 
KindEditor的图片上传实现:
前端js


$(function () { var Ke = new KindEdit_Class(); Ke.initKindEditor(); $(".btn_sub_comm").click(function(){ Ke.submitData(); }) }); 

function KindEdit_Class(){ this.kind = null; this.initKindEditor = function () { this.kind = KindEditor.create('#content', { width: '100%', // 文本框宽度(可以百分比或像素) height: '300px', // 文本框高度(只能像素) resizeType:0, uploadJson: '/uploadfile.html', //文件上传路径 extraFileUploadParams: { //文件上传的额外参数 'csrfmiddlewaretoken': '{ { csrf_token }}' }, //filePostName:'img', 修改上传的文件名字 //fileManagerJson: '/kind/file_manager/', //指定浏览远程图片的服务器端程序。 allowPreviewEmoticons: true, //预览表情 allowImageUpload: true, //允许图片上传 items: [ 'fontname', 'fontsize', '|', 'forecolor', 'hilitecolor', 'bold', 'italic', 'underline', 'removeformat', '|', 'justifyleft', 'justifycenter', 'justifyright', 'insertorderedlist', 'insertunorderedlist', '|', 'emoticons', 'image', 'link'] }); } this.submitData = function(){ this.kind.sync();//将KindEditor的数据同步到textarea标签。 if($("#content").text().trim() == ""){ alert("请填写内容") return; } var that=this $.ajax({ url:"/submitComment.html", data:$("#fm").serialize(), dataType:"json", type:"POST", success:function(data){ if(!data.error){ {#alert(data.message)#} {#that.kind.html("")#} {#$("#content").text("")#} location.href="" } } }) } } 后台图片处理:


url(r'^uploadfile.html$',home.uploadFile,{ "document_root": settings.MEDIA_ROOT,'web_root':settings.MEDIA_URL,'image_list':settings.IMAGE_FIELDS}), url(r'^submitComment.html$',home.comment,{ "base_dir": settings.BASE_DIR,'web_root':settings.MEDIA_URL,"document_root": settings.MEDIA_ROOT}), 

import datetime,json,osfrom utils import CustomXssfrom repository.Model import CommentModel as CmModelsfrom web.form.comment import CommentForm
1.图片上传到临时文件夹:


def handle_uploaded_file(fp,filePath,webPath,filename): if not os.path.exists(filePath): os.makedirs(filePath) with open(filePath+filename,'wb+') as destination: for chunk in fp.chunks(): destination.write(chunk) return webPath+filename


def uploadFile(req,*args,**kwargs): if req.method != "POST": return redirect('/') status = { 'error': 0, 'url': '', 'message': '' } if req.FILES['imgFile']: file_name = str(req.FILES.get("imgFile")) from blog import settings if file_name.split('.')[-1] in kwargs['image_list']: #先上传到临时文件夹中 #static_path = "comment/"+str(datetime.date.today())+'/' static_path = "temp/"+str(req.session['user_info']['id'])+'/' #以用户id为文件名的临时文件夹 web_path = kwargs['web_root'] + static_path file_path = kwargs['document_root']+'/'+ static_path ret = handle_uploaded_file(req.FILES['imgFile'],file_path,web_path,file_name) status['url'] = ret else: status['error']=1 status['message']="文件格式不正确" else: status['error'] = 2 status['message'] = "文件上传失败" return HttpResponse(json.dumps(status)) 2.用户提交数据后处理数据:
def comment(req,*args,**kwargs): if req.method=="GET": return redirect('/') form = CommentForm({ 'comment':req.POST['content'],}) status = { 'error':0, 'message':"回复成功", } if not form.is_valid(): status['error']=1 status['message']="评论字数过长" return HttpResponse(json.dumps(status)) Xss = CustomXss.XSSFilter(**{ 'content':req.POST['content']}) #要移动到的目录 moveToDir = kwargs['document_root'] + '/' +"comment/" + str(datetime.date.today()) + '/' #网站根目录 baseDir = kwargs['base_dir'] #网站相对目录 webPath = kwargs['web_root'] + moveToDir #临时文件夹目录 static_path = "temp/" + str(req.session['user_info']['id']) + '/' tempDir = kwargs['document_root'] + '/' + static_path #修改img标签src属性,并且移动图片路径 临时文件夹---->固定目录 Xss.clean_img(**{ 'baseDir':baseDir,"moveToDir":moveToDir,'webDir':webPath,'tempDir':tempDir}) #获取到了img src列表 #XSS过滤 content = Xss.process() # 获取到了用户的评论数据 #模型添加评论数据: models = CmModels.CommentModel() models.add(**{ 'art_id_id':int(req.POST['art_id']),'user_id_id':int(req.session['user_info']['id']),'comment':content,'parent_id':int(req.POST.get("parent_id",0))}) return HttpResponse(json.dumps(status)) 

from repository import modelsclass CommentModel(object): comment = None model = None Insert_Fields = ['art_id_id','user_id_id','ctime','parent_id','comment'] # Update_Fields = ['theme','title','summary',] 评论不允许修改 def __new__(cls, *args, **kwargs): if not cls.comment: cls.comment = super(CommentModel,cls).__new__(cls) return cls.comment def __init__(self): if CommentModel.model is None: CommentModel.model = models.Comment.objects def add(self,**where): data = {} for item in where.keys(): if item in self.Insert_Fields: data[item]=where[item] ret = CommentModel.model.create( **data ) return ret def search(self,**where): data = CommentModel.model.filter(**where).all() return data 补充:
# __new__: 对象的创建,是一个静态方法,第一个参数是cls。(想想也是,不可能是self,对象还没创建,哪来的self) # __init__ : 对象的初始化, 是一个实例方法,第一个参数是self。 # __call__ : 对象可call,注意不是类,是对象。 # 先有创建,才有初始化。即先__new__,而后__init__。 http://www.jb51.net/article/85719.htm
下面进行图片处理,将临时文件夹中的图片移动到固定目录,其余多余图片进行删除


from bs4 import BeautifulSoupimport shutil,os#单例模式实现class XSSFilter(object): __instance = None #__开头是私有成员,为了不让用户在外面直接访问,将变量进行了重新命名将__spam修改为_classname__spam,导致用户在外面是无法使用__spam的,但是用户一定要使用,那么可以使用替换后的名字_className__spam def __new__(cls, *args, **kwargs): #http://python.jobbole.com/86506/ if not cls.__instance: obj = object.__new__(cls) #父类执行,创建对象 cls.__instance = obj return cls.__instance def __init__(self,*args,**kwargs): # XSS白名单 self.valid_tags = { "font": ['color', 'size', 'face', 'style'], 'b': [], 'div': [], "span": [], "table": [ 'border', 'cellspacing', 'cellpadding' ], 'th': [ 'colspan', 'rowspan' ], 'td': [ 'colspan', 'rowspan' ], "a": ['href', 'target', 'name'], "img": ['src', 'alt', 'title','height','width'], 'p': [ 'align' ], "pre": ['class'], "hr": ['class'], 'strong': [] } self.soup = BeautifulSoup(kwargs['content'], 'lxml') # https://blog.csdn.net/kikaylee/article/details/56841789 #进行数据处理 def process(self): #遍历所有节点 for tag in self.soup.find_all(recursive=True): #遍历所有子孙节点 if tag.name not in self.valid_tags: tag.hidden = True if tag.name not in ['html', 'body']: tag.hidden = True tag.clear() #清除该节点 continue attr_rules = self.valid_tags[tag.name] keys = list(tag.attrs.keys()) for key in keys: if key not in attr_rules: del tag[key] return self.soup.renderContents() def clean_data(self,*args,**kwargs): ''' 回调函数, 用户进行扩展 ''' pass def clean_img(self,*args,**kwargs): ''' 回调函数, 用户进行扩展 #baseDir, 要移动到绝对目录(项目根目录) #moveToDir 要移动到的固定目录 #webDir 前端显示时需要的相对目录 #tempDir 临时文件夹目录 ''' # 这里就直接写在这里,不在进行继承调用了 move_dir = kwargs['moveToDir'] #移动的目录路径 temp_dir = kwargs['tempDir'] #临时文件夹 if not os.path.isdir(temp_dir): return if not os.path.isdir(move_dir): os.makedirs(move_dir) #处理img的src属性 for tag in self.soup.find_all('img'): # 遍历所有图片节点 src = tag.attrs['src'] root_dir = kwargs['baseDir']+src #文件路径 print(root_dir,move_dir) shutil.move(root_dir,move_dir) tag.attrs['src'] = kwargs['webDir']+src.split('/')[-1] #删除临时文件夹 shutil.rmtree(temp_dir) (最主要的功能是从网页抓取数据)


Beautiful Soup提供一些简单的、python式的函数用来处理导航、搜索、修改分析树等功能。它是一个工具箱,通过解析文档为用户提供需要抓取的数据,因为简单,所以不需要多少代码就可以写出一个完整的应用程序。Beautiful Soup自动将输入文档转换为Unicode编码,输出文档转换为utf-8编码。你不需要考虑编码方式,除非文档没有指定一个编码方式,这时,Beautiful Soup就不能自动识别编码方式了。然后,你仅仅需要说明一下原始编码方式就可以了。Beautiful Soup已成为和lxml、html6lib一样出色的python解释器,为用户灵活地提供不同的解析策略或强劲的速度
(文件和文件夹进行移动、复制、删除、重命名,主要依赖os模块和shutil模块)